Saturday, 30 June 2012

It's the Weekend!

Hello friends
It's the weekend..do you think it will feel like a Summer one?

First off...Lesley who commented that she had problems with her Grand Calibur - please drop me an email.
Next let me show you this...
This is Carole's Box Frame completed!
She chose to distress the frame with a mixture of Vintage Photo and Wild Honey inks and then went over the entire box with Picket Fence distress stain. To decorate the boxes she used a mixture of Spellbinder flowers,  a few from Ribbon Buckles, a little bird and (I'm delighted to say...) some butterflies!  
Carole said "just to mix it up a bit I just used some pretty polka dot buttons ties with bakers twine on some of the boxes and added some pearl gems to a few of the more simple dies. It was great fun from start to finish. I loved all the card patterns for the lids too. So now I have a set of boxes ready for when I need one for a small present, like a piece of jewellery or choccies, but of course I won't want to touch it now, will I?!"


What a difference decorating makes..here is my box frame still 'naked'....!!
I have a couple of frames remaining should anyone wish to order - all the details can be found here.
As mentioned, I will be putting together a Christmas version later in the year.
In fact there will be a new kit coming along next month featuring a wooden plaque - 
sketching out plans for that right now.
Back tomorrow dear friends - have a super Saturday!

Friday, 29 June 2012

Friday Die-Day!

Hello friends,
Thank you for your brilliant support yesterday with my reveal of new dies.  
You never know which new dies are going to be allocated to you to showcase, but so far I've always been thrilled with the ones I get to play with!  
Using the Premium Craft Foils really adds that extra pizazz to a project.  
I've discovered that here in the UK you can buy them from here (free postage and packing too!) 

Also yesterday my blog got a makeover courtesy of the brilliant Laura Jane - so what do you think?
A couple of people have mentioned that the link text is difficult to see..I'm going to work on that - it appears it looks different dependent upon your computer - I've been making the boys call it up on their laptops etc!
I am loving my butterflies that wings look like hearts.

Right that's enough of me chatting on..we need to get to Friday Die-Day....
This week I'm featuring Romantic Rectangles
You receive 4 die templates with this set.
 This is how they look cut/embossed and stencilled.
I would recommend that when you are cutting you use a piece of waxed paper, the edges are intricate and it makes removing your cardstock/paper from the die so much easier.
 I think it is safe to say that most weeks I'm going to be featuring a tag! :)
Here I've used number 3 die template (smallest is always no.1 and count outwards).
I've inserted the tag inside the die so that only the bottom will be cut/embossed.
(Very much in love with my smaller plates - certainly cuts down on 'winding time').
 Here you can see how it has just cut/embossed a strip along the bottom of the tag.
 I've gone for red!  Applied some dotty paper and then from plain red paper cut/embossed No.2, attached with foam pads.
 And because I like to hold on to things - I'm using the Daisy Flower Topper I made some weeks ago...
 My signature piece of ribbon and twine.. it's lacking a butterfly isn't it - what was I thinking!?
Don't forget I'm still 'taking orders' on Friday Die-Day - drop me an email by using my super new button on my sidebar..can you tell I'm a little bit excited about my new blog!
Have a brilliant weekend dear friends. 

Thursday, 28 June 2012

Sneak Peek: Spellbinders™ Summer Spectacular - Day 8


Hello friends,
Today is a truly special post as I can share with you a project I made using brand new die templates, 
never seen before!  These will be revealed at CHA but I get to show them here first!  
They are Asian Accents and Asian Motifs.

Approximate Die Templates Sizes:
Flower Accent: 1 1/8 x 1 1/8”
Corner SM: ¾ x ¾”
Corner LG: 1 ½ x 1 ½”
Oval Label: 3 ¼ x 1 ¼”
Motif: 2 7/8”
Border: 8 ¾ x 1”

Approximate Die Templates Sizes:
Coin: 1 1/8”
Circle Tag: 1 1/8 x 2 1/8”
Motif SM: 1 ½ x 1 ½”
Motif MED: 3 1/8 x 3 1/8”
Motif LG: 4 x 4”

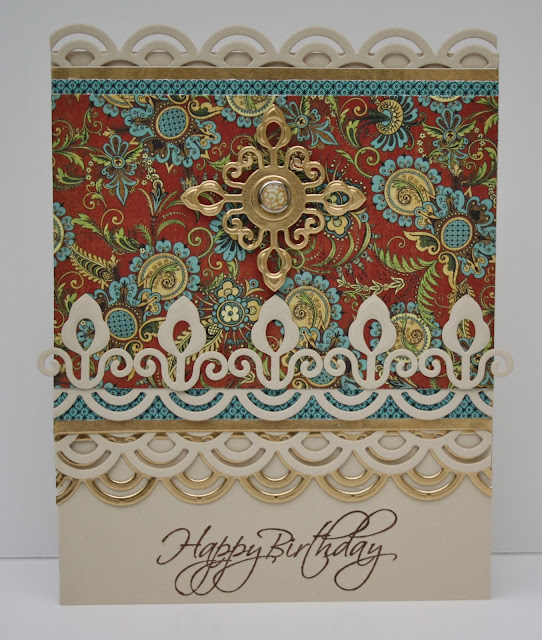
Here I have made a card featuring these gorgeous dies with some added gold!
Supply List:
Asian Accents S5-123 MSRP $29.99
Asian Motifs S5-124 MSRP $29.99
Paper - Graphic 45  – Olde Curiosity Shoppe
Stamp - Penny Black  – Flourish Birthday
Brad – own stash

Create a card from cream cardstock 6 x 5".  Select your patterned paper, cut into panels - the largest measuring 3½ x 5" and two strips of 1 x 5".
Cut/emboss decorative strips and smaller elements from matching cream cardstock in 
the Grand Calibur die cutting machine®.
Using Spellbinders craft foils, gold – cut/emboss the pendant.
A useful tip is to insert the brad while the foil is still in the die template; it holds it firmly in place.
Stamp a sentiment to bottom of card.  Begin to layer up your panels inserting the decorative strips 
and two strips of gold foil too.
You can see from this picture the layering and how wonderfully realistic the gold foil looks.
Finally add a row of five of the smaller decorative elements and attach your pendant using foam pads.
These die lend themselves to all sorts of projects, here I have chosen to use them to create a notebook.  They layer so well and the decorative strip looks superb the other way up too!
The Sneak Peek: Spellbinders™ Summer Spectacular! Begins on June 21st and will end on June 28th, 2012. It consists of 24 individual prizes and one grand prize drawing.  
Enter the Sneak Peek: Spellbinders™ Summer Spectacular! by visiting the participating blogs each day.
At the end of each blog post, click on the "Enter HERE" to open the entry form. You may only enter once from each blog each day.
Spellbinders™ will randomly draw one winner from each participating blog to receive that blog’s newly revealed dies. The Grand Prize Winner will be randomly drawn from the pool of entrants who sent entry forms from each and every participating blog during the 48 hours each blog was open. For the full list of official rules please click RULES.
**Enter the contest by clicking HERE**
Thank you for stopping by today and be sure to visit all the other designers on their Blog Frenzy dates for more chances to win: 

Questions? 
No entries will be accepted at this email address.


This contest has now closed.


Wednesday, 27 June 2012

Remember That Fabric Flower?

Hello friends,
Remember that fabric flower
Well I had a little more of that fabric and used it as a background to a pretty frame.
I then made a further flower using the Dahlia die and lighter patterned fabric.
Again, just by adding some fabric glue and a tiny bit of pinching to the flower middle you 
get that little bit of dimension. To finish I added a button to the middle and twine.
The little box frame is from Ikea.
I have an admission to make..I made this to submit to a magazine but I liked it so much 
I knew I couldn't part with it.  I've kept it!  
It is on my shelf with other bits and bobs that make me smile.
Remember with the Grand Calibur® you can certainly go beyond paper...
BIG day tomorrow...so excited to share with you my project for the 
Take care,

Tuesday, 26 June 2012

A Variety Today!

Hello Blogland friends,
Yesterday's fabric pretty flower - I just used the fabric on its own, no backing.
As I assembled the flower I added some glue to slightly gather the middle and then added a brad.
Fabric makes a nice alternative to felt but I think I'm still in love with cutting felt! 
In fact, this is just a little sneak peek of a little project I'm making for someone in my family...
Now do you recall this card? 
The phrase 'Imitation is the best form of flattery" was coined by an Eton chappie named 
Charles Caleb Colton - well Charlie I couldn't agree more!
A lovely lady called Gemma who follows my blog, got in touch with me after I featured this card and said she would like to make it.  Unfortunately the stamp I used was out of production but clever Gemma improvised - she used an alternative stamp and instead of Carnation Creations for the flowers she opted for the smallest die in Grand Peony Creations and isn't it superb!
The flowers are cut/embossed from paper that Gemma printed from a Polka Doodles CD.
It is so pretty in pink too!
Thank you Gemma, 
I'm thrilled you sent me your photos and allowed me to feature them here on my blog.
Back tomorrow friends,
Take care,

Monday, 25 June 2012

Pink and Flowery!

Hello friends
Apologies to those who have emailed me and it has bounced back...email seems to be behaving 
badly at the moment but hope to have it sorted soon.

The Spellbinders Summer Spectacular continues..such amazing dies with brilliant innovative ideas.
Lots of You Tube videos to watch - they explain so well how each of these new dies work.
My reveal day is Thursday so please stop by if you can.
I'm afraid you will all want to go shopping...! :)

Thank you for your kind comments yesterday - the very authentic cobwebs come in a spray!
I did not know this but yes, apparently you can buy it and spray it over where you need..
I'm afraid to admit if I look up right now I have a genuine cobweb above my head...
I think crafting has taken over from housework right now!

Delighted you liked Christmas on Saturday.
I've discovered that Frosty Forms are available in the UK from Create and Craft and also here.
For the etching cream, Etch-All is unavailable here at the moment but Fred Aldous has some etching cream - it's not the cheapest crafty item but I have to say it lasts and lasts because you can scrape what you don't use back into the bottle and re-use it.


So...my card  today- I cannot recall whether I have shared this with you before! 
I came across the image in one of my computer files and thought I would share it with you today.
It's flowery, light and full of Summer...mmm what's this 'Summer' word I keep hearing!?
I've used Rose Creations to cut the pretty fabric and just added a brad for the middle.
Combined some lace, punched kraft cardstock and the backing paper is a piece of 
Cath Kidston notepaper.
Spot the tiny dotty butterfly..?  
Have a great day friends, take care.

Sunday, 24 June 2012

Miss Havisham's Tea Party

Hello friends - happy Sunday!
Yesterday afternoon I went to Miss Havisham's Wedding Feast Tea Party!
St Mary's Church in Higham (just up the road from me) hosts fund raising events on 
behalf of the Church Conservation Trust.
My big sister works very hard for the CCT and did an amazing job 
preparing a themed Miss Havisham's Wedding Feast.  
Just in case any of you are not aware who Miss Havisham is - she features in Dickens' - Great Expectations.  At twenty minutes to nine while dressing for her wedding day Miss Havisham receives a letter from her betrothed calling off the wedding (he wasn't at all nice - he was out to swindle her of her riches!)  
Humiliated and heartbroken she has all the clocks stopped at the exact point she learns of the betrayal.  
She continues to live in her decaying mansion never removing her wedding dress and 
leaving a wedding cake uneaten on the table.

I thought it would be nice to share some photos with you, here is the decaying table, cobwebs look so real.
 Bouquet of dead  flowers...
The uneaten wedding cake (made by my clever sister) the top tier is real (no cobwebs on that!)
and first prize in the raffle!
It comes complete with mice and a wedding ring!
More decay...
More mice and decay...
A teapot of course!
And 'Miss Havisham' made an appearance too!
I probably should mention our tea was delicious - cakes and plenty of tea 
held at the other end of the church!
Well that was something different to craft wasn't it!
Back tomorrow friends.
Hope you are having an enjoyable weekend.

Saturday, 23 June 2012

It's Christmas!

Hello friends,
Okay so it's not really Christmas but here is something festive.
Spellbinders have produced a gorgeous set of new dies called Frosty Forms and 
one of them features this lovely reindeer.
I've created something different by using the die to etch the image onto glass.
I discovered this glass ornament in Hobbycraft and realised it was the same shape as the 
This isn't as tricky as it sounds - you die cut your image with sticky back plastic - 
the vinyl kind - you can get this in DIY stores.  Place the image onto the glass and 
smooth it down, make sure the edges are completely flat and no air bubbles.
Using etching cream - follow the instructions (I used Etch All) smother the whole ornament and wait..(impatiently if you are me!)
When time is up - you scrape it off and wash it away, remove the sticky back plastic reindeer die cut and that part remains clear.  
I've added a small Layered Poinsettia and attached dotty ribbon and twine. 
It makes me feel Christmassy already! 
And...just a couple of Bella Birthday photos to share...
new squeaky toys that look like cakes (with hindsight this is pretty cruel!) ...
 especially when she did her hardest to eat them! 
Take care friends and hope you are all having a lovely weekend.


Friday, 22 June 2012

Friday Die-Day!

Hello friends
It's Friday and in my crafty world that can only mean one thing...
Friday Die-Day!
This week I'm going green...with Foliage.
I think I over-use the word 'useful' but honestly this is a seriously USEFUL set of dies.

You receive 6 dies in total and if my nature skills were good I could tell you what sort of leaves these are
but for now I'm going to say they are a nice variety!

This is how they look cut/embossed and stencilled. 
 One of my favourite things to do is to stamp them using a script stamp and this also 
looks effective when heat embossed (example coming up....)
Someone last week said she is going to call me the 'tag lady' - this made me laugh and I'm thinking she is absolutely right and I'm going to go with it...so yes, again this week I'm creating a tag! 
I've used one of the foliage die templates as a stencil to spritz through with Glimmer Mist.
And, with a little bit of assembling and using the Bauble Blossom One that I created some weeks ago,
I have a finished leafy tag! 
And this is the example of the leaves stamped and heat embossed.
Before I go I have something to tell you...
it is Bella's Birthday today - she is 1 year old.
I think that calls for special treats and some new toys.
Here she is the very first day we brought her home.
Have a brilliant weekend dear friends, let's hope we have sun and creative fun!
Take care,


Thursday, 21 June 2012

Chipboard Banner and a Winner!

Hello Blogland
Firstly let me tell you all it is Day One of Spellbinders Summer Spectacular!
Over the next 8 days you are going to see so many wonderful new dies 
and I have a special reveal coming up on my blog too! 
Thanks for the comments on my shopping list notepad yesterday,
for those that asked where I bought the notepad from...nowhere glamorous - in fact...Asda!
Today I'm featuring another bold bright card using Bo Bunny Alora papers 
and this time a little chipboard banner.  
I sprayed the chipboard with some glimmer mist - it really absorbs it! 
I then inked the edges with some white Colorbox Chalk Fluid.  
My banners are then adorned with Classic Hearts and little butterflies.
Now the important stuff...
An amazing response to my giveaway and interesting reading - I think we are all agreed that there is a strong craft addiction out there, closely followed by chocolate, ice cream, wine and other scrummy items - personally I think we should indulge in them all and at the same time!
But, back to the announcement.
This is Bella listening to me - I'm explaining she has to pick out a winner....!
 She takes her task seriously and dashes across the room with the winning name...
 I retrieve it before it is doggy disintegrated!
 I can officially announce the winner of Wings of Hope is............

NATTYBOOTS  
Congratulations!  
Drop me an email: christine.emberson@blueyonder.co.uk 
with your details and I will pop them straight in the post to you.
Thank you to all who took take time out of their day to leave a comment - more giveaways coming up.
Tomorrow is Friday and we know what that means....!
Take care friends.

Related Posts Plugin for WordPress, Blogger...