Friday, 12 April 2019

Friday Die Day

Hello friends

A slight variation on this week's Friday Die Day as I'm featuring
another one of my Vintage Treasure Collection makes
so not so many steps but I'm sure you will get the idea :) 

This project is made with Tiffany Lavaliere.
A 6 piece die set and the approximate measurements are:

Large Circle: 4.95 x 4.95 in. 12.60 x 12.60 cm
Inner Layer: 4.90 x 4.90 in. 12.40 x 12.40 cm
Second Rim: 4.20 x 4.20 in. 10.70 x 10.70 cm
Second Pattern: 4.00 x 4.00 in. 10.20 x 10.20 cm
Third Rim: 3.60 x 3.60 in. 9.10 x 9.10 cm
Medallion: 3.55 x 3.55 in. 9.00 x 9.00 cm

To start I selected an 8 x 8 card base,
matted wtih silver mirror card and patterned paper.
You will see that I've used the medallion die for this card.
It comes as an insert and outer die, use both to create
the die cut and cut four times.
(Lighting a bit tricky as indoors from the pouring rain!)


Once each medallion was in place with 3D Foam Squares,
placed squarely as opposed to diamond,
I added flowers to the centre of each, Cinch and Go V.


I've coloured the flowers with distress inks - kept to Spring colours.


Because Cinch and Go Flowers V have a hole in the middle
they are perfect for adding brads.

Items used with clickable links: 


I'm heading off to a craft workshop tomorrow with Eileen Godwin,
I'm getting inky with a brayer apparently! 
I'll keep you posted.

Wishing you all a wonderful weekend, fingers crossed for 
sunshine so we can venture into the garden.

Take care friends.

Monday, 8 April 2019

Cannetille Rectangle and a spot of gardening!

Hello friends

Hope you all had a good weekend, weather wasn't up to much was it!
Today's crafty offering is Cannetille Rectangle.
This is a very elegant die set designed by Becca,
one of her Vintage Treasure Collection.


I used nearly every die in the set to create this layered card
and featured Cinch and Go V flowers for the centre.


The papers are from Creative Expressions and I've used plenty
of silver foil card as usual!


Here's the same card with a different colourway and
alternative flowers to the centre. 


Added a couple of pins too - forgot I had these pearl ones.


Items used with clickable links:


Start of a new week and I'm hoping to be back to normal
vision and crack on with some craft.
If you follow me on Instagram you may have spotted that I'm
taking part in the 100 Day Project with some crochet, 
I'm a strict beginner with that!

I also have an Instagram account called The Titchy Garden


It is an attempt to makeover my little garden this year.
Recently purchased a new plant (Colin, yes I name plants!).
Our local garden centre was celebrating
its 40th birthday so 40% off a plant, I went big! 

Before...

Then off to B&Q to buy a new pot.
After...


Don't worry about following Bella on Instagram, she's gaining
far too many followers! ;) 

Take care friends, have a wonderful week.

Friday, 5 April 2019

Friday Die Day

Hello friends

It's Friday and this week I'm featuring Delicate Tendril Border,
one of the Vintage Treasures Collection dies.

This is a 4 piece die set and like quite a few in this collection,
you have the option of using it as an inset or adding the rim dies to create
a full die cut.

Outer Rim: 5.00 x 2.35 in. 12.70 x 6.00 cm
Pattern: 4.90 x 2.05 in. 12.50 x 5.20 cm
Flourish: 5.00 x 0.80 in. 12.70 x 2.00 cm

I used this die as a TV demo to create a mini notecard holder.
Here's the instructions - different coloured card but the same rules apply.

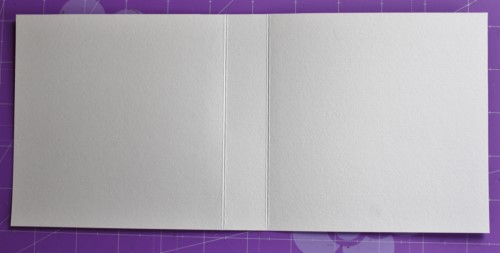
First, cut a piece of cardstock to 5″ x 11″ and score at 5″ and 6″.  
This is your outer cover, position the inset die to the top,
which way up is your choice!

CEmberson - Notecard Holder 1
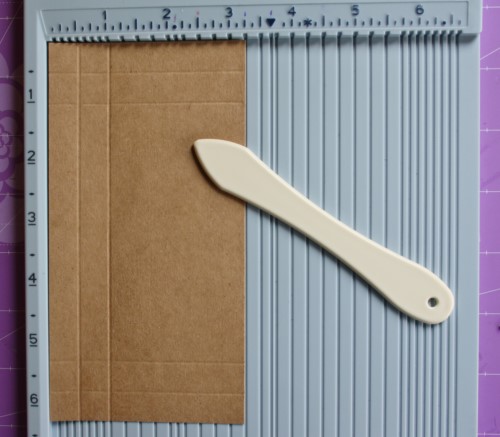
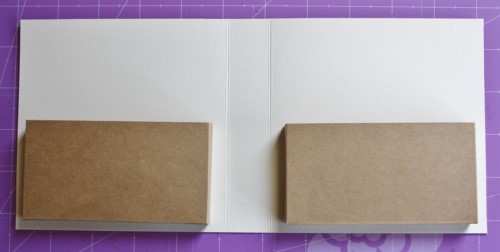
For the inner pockets, cut two pieces of card measuring 3.25″ x 6.25″.  
Score each pocket at 0.5″ and 1″ on all three sides.
CEmberson - Notecard Holder 2
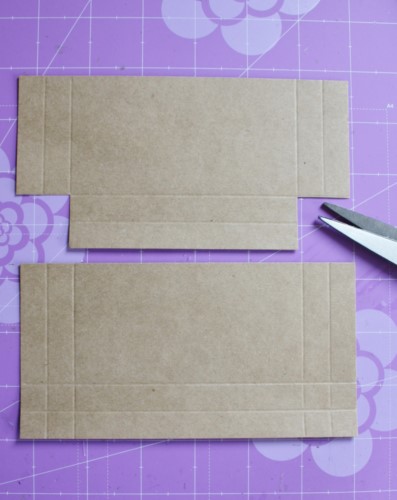
Cut the bottom square sections from each of the scored pockets – see picture. 
CEmberson - Notecard Holder 3
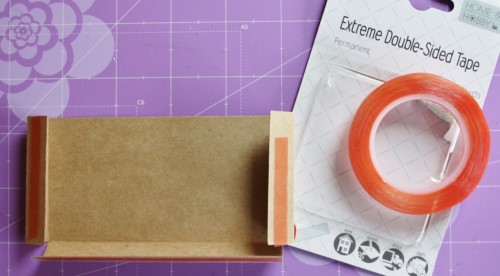
Using a bone folder, fold along the score lines and attach Extreme Double-Sided Tape.   
CEmberson - Notecard Holder 4
Affix as pictured.
CEmberson - Notecard Holder 5
Here's how it looks in the ivory.

Cut an additional Delicate Tendril Border die cut and affix to the bottom
of the outer cover.
Here's how the covers look using the die different ways up at the top.
Still not sure which one I prefer. The Flourish is cut from gold,
again placed different ways up and the left hand one has added pearls.

Inside I've created mini gift cards using Nobel Chatelaine
and Cinch and Go V
Simple designs with plenty more gold!


Mini cards.


Items used with clickable links:

Delicate Tendril Border
Nobel Chatelaine
Cinch and Go V
Extreme Double Sided Tape


Eye news - check up yesterday, all pretty much going to plan except
struggling with bright light including the PC screen
(typed this over the course of two days!)
It just needs a little bit more time to settle down so the next op
has been postponed to just before Easter.

Take care friends and wishing you all a lovely weekend.

Wednesday, 3 April 2019

To Infinity and....!

Hello friends

I'm managing to catch up with some work including taking photos
of recent projects.
Today sharing with you this HUGE card, well it is huge for me.
It measures 8 x 8 and I rarely make big cards but felt it would 
look good as a telly project.

It features two of the Vintage Treasures dies - Infinity Link Border


I chose to use the Infinity Link Border twice as border insets and 
placed pale green paper behind. 


I then used the Bella Luce Oval die (with plenty of mirror card again!)
as a central focal piece and added peach flowers.


It is a fresh looking card and I really like the layering of those ovals
to the centre with Crafty Foam Tape.

Items used:


I'm still limiting my computer time as the screen is very bright
but I'm super happy with how much more I can see.
I have a follow up appointment tomorrow so fingers crossed
the consultant is happy too.

Hope your week is ticking along well.

Take care friends.

Monday, 1 April 2019

Brilliante Rondelle and Bright!

Hello friends

Hope you all had a lovely weekend and all the Mums' got
spoiled yesterday.
I received a set of candles, fabric scissors (for my quilting)
and chocolates -
very happy with that Mother's Day haul!

As promised I'm going to share some of the telly projects that
I created and today is Brilliante Rondelle.
A 7 piece die set and I've chosen to use the outer dies 
affixed over acetate to create this tent fold card.


My passion for foil card is not waning!


I inserted ribbon by cutting a small slit at the top fold of the card and affixing
under the flowers with Crafty Power Tape.


The flowers are Cinch and Go V, Becca's latest flower for this
I've chosen to use just the smallest flower and colour with Peacock Feathers
Distress Ink.


Items used:


I will be back with more projects but I'm having to limit
my computer time at the moment as getting used to my new eye.
Everything is so bright! I purchased some bathroom towels earlier
in the year thinking they were a deep teal colour and no,
they are bright bright turquoise! 
Aside from that I'm loving that I can see so much more 
(except all the housework that needs doing).
All going well I will be having my second eye done
in a couple of weeks, goodness know how bright everything will be then! 

Have a fantastic start to the week and look out for those April fools!


Thursday, 28 March 2019

Friday Die Day (Early!)

Hello friends

I got back from tellyland yesterday afternoon.
Really enjoyed my Spellbinders shows featuring the 
certainly had a giggle! 
I was asked if I would be sharing my telly projects here
on my blog and yes, as soon as I get to photograph them all.

Today I do have one up and ready to go and that is Floral Tiara Topper.
A 5 piece die set and the approximate measurements are:
Outer Cut: 5.50 x 2.15 in. 13.90 x 5.50 cm
Pattern: 5.20 x1.90 in. 13.20 x 4.80 cm
Beaded: 5.55 x 2.15 in. 14.10 x 5.50 cm

I'm really addicted to drop shadowing the die cuts so I've cut
two from silver foil card and two from white card.
Affixed the white over the silver.


I then die cut flowers and coloured them with Aged Mahogany Distress Ink.
The flowers are Cinch and Go III.


I chose to make a BIG card, an 8 x 8 card base with silver foil
mats and coloured paper.


Positioned and placed the two die cuts.


Added a piece of scrunched/folded ribbon, held in place with 3D Foam Squares.


Also using 3D Foam Squares attached the flowers and sentiment.


Added pearls to the centre of each flower to finish,
something I had a little trouble with on the telly as my eyes were just not good!
The finished card...quite a few photos!


I'm doing FDD blog post early as I'm going to have some eye surgery
today and not sure what I'll be seeing afterwards, hopefully it 
will be a whole new world! 

Items used today with clickable links:


The whole Vintage Treasures Collection can be found here.

Big thanks for all the support, I'm due back at Hochanda for
some more shows soon and I'll keep you posted.

Take care friends.


Related Posts Plugin for WordPress, Blogger...