Sunday, 19 April 2015

Blog Hopping with Bo Bunny!

Hello friends

Today I'm taking part in the Scrapbook Adhesives by 3L® blog hop
with Bo Bunny - it's Day 1 and it's going to be a whole week of fun with a chance to win!


If you stop by the Scrapbook Adhesives by 3L blog each day you can enter to win
as well as following the links to other blogs - feast your eyes on fabulous
projects and again opportunities to win...that's all good isn't it!

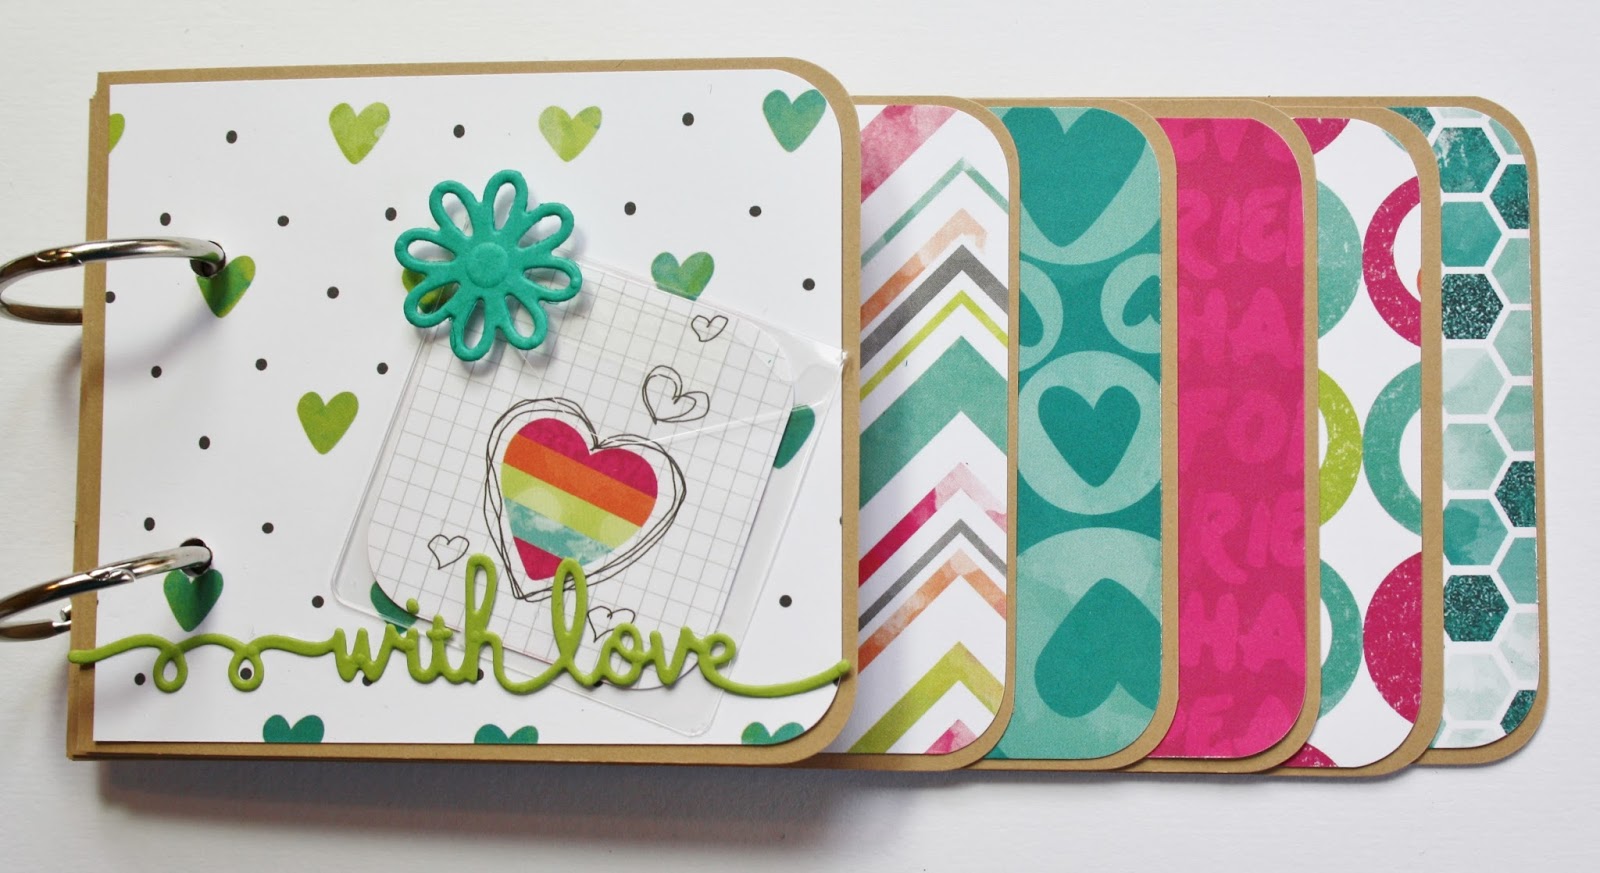
My project is a tag album it uses the fresh and bright Forever Young papers by Bo Bunny.
Here's how to make it...
From kraft card cut 6 strips measuring 8" x 3.5" - round the corners at one end.
 Taking 5 of the strips stagger/step them and trim them all at one end.
I just eyeballed this but you can measure if you wish.
With the remaining full length strip fold in half and round all four corners -
this creates a little folder cover for the first page of your tag book.
Now the fun bit - decorating each tag.
I selected the papers, cut each one to size and adhered with MyStik® Permanent Strips..

 Here is each tag with coordinating papers.
 I then punched two holes and inserted the book rings.
 For the cover I used one of the smallest Keepsake Envelopes, cut and inserted a
decorative piece of paper from the Bo Bunny range.
 Added a die cut flower and affixed with 3D Foam Squares - White, Small.
To complete the cover I added a 'With Love' die cut sentiment.

Here are the giveaway details...
a Rafflecopter giveaway

And please be sure to visit all of today's Designers:


(Aware that some of the links are not behaving...geek squad looking into it!)

Wishing you all a wonderful and creative Sunday!

Supplies used:

Bo Bunny: Forever Young Papers
Dies: Spellbinders - Sentiments 3, Pretty Petals D
Book rings, kraft, jade and green cardstock

Saturday, 18 April 2015

I've been travelling!

Hello friends

If you follow me on Facebook you will have already seen that I took a trip this week to
Ideal World/Create and Craft TV studios with Kim Hupke, Spellbinders Education Director.
Kim had flown over from Iowa and had such a busy time demoing
the new Spellbinders Victorian and Victorian Garden dies.
I was there as Kim's travel buddy, helping out between shows, I made the
boards that display the dies etc.
Here we are, do we look awake?  This photo was taken at around 7am!


It's always so great to catch up with my colleagues from Spellbinders and Kim
is such a special lady and friend... and such fun!


I arrived home and went straight back to my City job so it's been a bit of a change this
week, feeling slightly out of sync but I will be back in my cabin getting organised
and crafting again.

Talking of craft....this month's Charity Kit
There is ONE kit left!
It's been a real success so thank you to everyone who has purchased.
The one kit is available on the website here.

Update: now completely...

Other bits and bobs:

Lesley asked where I purchased my script stamp from.
My stamp is old and is Penny Black but I have these background script stamps on order.


Please visit the website here for more details and to pre-order if you wish.

If you like embossing powders you may want to check out the Spring Sale -
all WOW embossing powders are now included.

Well that wraps up today's blog post, stop by tomorrow and hoping
you are all having a sunshine filled weekend.

Take care friends.

Friday, 17 April 2015

Friday Die Day

Hello friends
 
For this week's Friday Die Day as promised a full Zinnia tutorial.
The dies measure approximately:
 
Star Floret: ¼” (10 pieces)
Petal 1: ⅜ x ⅞”
Petal 2: ½ x 1”
Petal 3: ⅝ x 1⅛”
Disc Floret: ⅞”
Leaf: ¾ x 1¼”
Stamen: 2½ x ¼”
 
You can see here I've started to die cut all the elements to create a full Zinnia flower.
Each disk floret has 10 points, you adhere a petal to each point.
Here I've used 9 disc florets to create three of each petal size.
I also added some ink to the central area.
Layer up the petals alternating them slightly.
Having a lot of layers really creates a gorgeous full flower.
To create the stamen, cut a total of 5 stamens and join them together to create a long length.
I used a quilling tool to start off rolling it and then reverted to my fingers.
As I rolled I began to 'fluff out' the top section.
Until it looks something like this. Glue the end down firmly.
Position and adhere to the middle of your flower.
The finishing touches - leaves and star florets.
If you visited my blog earlier this week you will have seen that I used this flower on a heart
project - it would also look wonderful on a gift box too.

Zinnia is available to purchase on the website here - nice price too! :)
Take care friends and have a brilliant weekend.
 

Wednesday, 15 April 2015

International Ambassadors Springtime Blog Hop

Hello friends

The Spellbinders International Ambassadors are having an informal blog hop again
and this time we are going Spring-like and flowery!
We have been having so much fun with these blog hops and delighted at how many of you
visit, play along and leave such lovely comments.  
I hope you are getting to know us and seeing our different styles,
each one of us is unique in our creative styles - so there is something for everyone!

Spellbinders® create the most beautiful flower dies and today I've chosen to use
one of the newest dies - Zinnia to decorate a heart.

Firstly, I selected a wooden/mdf heart.
Using a makeup sponge I applied regular white paint.
Once dry I applied distress ink to the edges and stamped a section of the heart with
a script stamp.
I then die cut a heart outline using Classic Hearts from wood-grain paper.
You can see I offset the dies to make the top section of the heart slightly thicker.
Positioned this on the heart base and applied a strip of cream lace.
I then began to make the Zinnia flower -
I chose to make a very full flower and created three layers of each petal size.
(stop by on Friday for a full step by step tutorial).
The layered flower with the centre stamen.
The leaves and star florets added.
The finished heart.

Here is the list of blogs to visit, have fun looking at the all the different projects.
 
Christine Emberson (You are here)
 
Thanks so much for stopping by - we hope you enjoy your time with us.
We will be back with more!

Take care friends.
 

Tuesday, 14 April 2015

Tuesday Tip/Technique

Hello friends
 
I'm talking about flowers today and some tips regarding shaping them.
There are quite a few techniques and you can use various  tools...
although I would refrain from using cat paws, even if they REALLY want to help!
This is Darcy doing her best to assist with Carnation Creations.
Shaping flowers definitely depends on what medium you use,
paper versus card.  Card can be inflexible so if it is particularly thick card it is
worth spritzing with a fine mist of water -
it really helps release those fibres and allows hours of tweaking!

Tools: Tool n' One, files, embossing tools, cocktails sticks, kebab skewers, cotton buds,
pen lids - I've tried all of these and probably some more.
We each find our favourites and what works well, I recommend you experiment
and then keep your preferred tools to hand (I need to remember that!)  

 
A soft mat: the mat I use originally came with brads inserted into it, these are ideal
for really getting to grips with shaping those petals.
But if you cannot lay your hands on one of these pop into Poundland/99p store
and purchase a mousemat.
 
Cut it into 4-6 sections, layer and glue each one until you've got a glued stack -
it make a great shaping mat.
 
Bitty Blossoms - before rolling, shape the petal areas by pushing
 down into your foam for the first few petals but then flip your flower over
and push down from the reverse side.  

This means when you start to curl,
the middle section is inwards but the outer edge will splay open.
Inking: highlighting the tips of your petals adds realism.
Create A Daisy.
Stencilling through the die for leaves looks beautiful, try using patterned paper for your
flowers and leaves too.
Before you know it you will have a whole floral arrangement - beautifully shaped!
 
I think I spoke too soon about the lovely weather, it's turned a bit chilly again now.
 
Take care friends and stop by tomorrow.
 

Monday, 13 April 2015

Spring is in the air!

Hello friends

Spring is definitely in the air and I thought I would celebrate with a bright
and flowery card today.
Before I matted striped green paper onto a kraft card base,
I cut a circle aperture and placed some flowery paper behind (a scrap box find!)

Again from the scrap box I cut a banner, wrapped around some twine,
placed a strip of kraft card across the top and secured down.

The embellishment dies are Flower Play and featuring the new Flower Play stamps -
these are really nice and I'm expecting delivery of them today!  
All the details are here.
My favourite Sprigs is placed behind the flower and the Happy Birthday is
Sentiments 3.

The weather was gorgeous at the weekend, Bella went on lots of walks.
The minute we return she's quite ready to go out again!

Big thanks for the lovely response to this month's Charity Kit,
I'm already planning the May Add-On Kit ...!
There are just half a dozen kits left so if you would like to purchase please
visit yesterday's post or hop over to the website.

Take care friends - wishing you all a good start to your week.

Related Posts Plugin for WordPress, Blogger...