Saturday, 21 July 2012

Sticky Time ..again!

Hello friends,
These posts for Scrapbook Adhesives come around quickly! 
I can at last show you the birthday card that I made for my mum.
It features an original photo of my mum as a sweet little girl.  I really didn't want to spoil it with glue so I used 
Those gorgeous flowers and leaves are from the new dies designed by Julianna - 
All the details can be found over on Scrapbook Adhesives blog here -
so grateful if you are able to hop over and leave a comment please.
Take care friends - I'm off to sort some kit ideas.....

Friday, 20 July 2012

Friday Die Day!

Hello friends
Amazing response yesterday, lots of ideas to consider - thank you so much.
It's Die Day again and it feels different this week because my London working days have changed,
I keep annoying the boys and asking what day it is!
This week I'm featuring Floral Tags

You receive 9 die templates with this set, 3 are tags,
2 flowers and 4 decorative leaves (always need foliage!)
 Here they are cut/embossed and stencilled.
Immediately I've picked out my favourites...
The beauty of these dies is the little bits that you can lift - I use a pokey tool or a cocktail stick.
I've gone with a tag...no surprises there! 
Created my music background with tissue tape. I then decided to see if I could incorporate 
every die cut on the tag and nearly got there...
The upright floral tags I cut in half and mixed them up, I love the kraft tag with a little bit of stamping.
 
All I had left was the pink flower and one leaf!
Thinking about it, you could just place this on an envelope or gift parcel for a nice touch.
Remember to lift up those petals for extra dimension and I like the way you can sort of interlock them.
Have a great Friday friends.
Take care.

Thursday, 19 July 2012

Feeling Happy Giveaway!

Hello friends,
I've been so thrilled with the wonderful feedback from you all regarding my studio,
I never thought in a million years that I would have my own special crafty place
so I'm VERY VERY happy.
Kits and classes details will be coming shortly - there will be a real variety.
I'm aiming to have 2-3 hour classes for those fitting around school runs.  Classes in the evening for those who work, as well as possible 2 day courses for those who live a distance away,
(we have a Premier Inn close by so it should keep pricing down).
Running up to Christmas there will be classes galore - I'm always a tad over excited with Christmas craft!
So, to celebrate all these plans I think we need a giveway!  How about a set of dies.
These are super useful for cardmaking, scrapbooking, tags and more.
The smallest one reminds me of a brooch.
So, still thinking about classes, how about some requests/ideas - would you like cards, scrapbooking, altered art - a series of classes to create a larger project or a quick drop-in to make a couple of cards??
ALL suggestions truly appreciated.  I've asked Elliott (my youngest) to put together a feedback survey -
jolly useful these teenagers!
Before I go - not craft related at all but here's Bella after a walk in the woods...
I will clean her up before she picks out a winner!
Just leave a comment and I will post the lucky name on Tuesday.
Thanks again and take care friends.


Wednesday, 18 July 2012

Some Studio Pics!

Hello dear friends,
Yesterday morning at 7am(!) I took my camera along to the studio, 
hence why the street is deserted!  My studio is in this lovely line of shops and offices.
 A couple of doors along is this gorgeous wedding/celebration cake shop.
Here is the entrance - Longferry House - has quite a nice ring to it I think!
And here are a few sneak peeks of what's going on.
I've been purchasing quite a few of these units...

A place to display the cards and tags that my lovely follower friends send to me. 
I purchased this little shelf for £2 in a charity shop, perfect for housing all the little misting bottles etc.
Beginning to fill up the paper trays...
A view of my workdesk.. apologies terrible lighting in my photo, the sunlight is lovely but blinds are 
due to be fitted very soon!
It's still a work in progress - various wall decals are going up, the bunting and butterflies of course.
Lots more crafty items still need to be transferred from home, but I really want to share with you 
how things are going so far.  Also my lovely Mum and Dad are driving all the way to Reading 
on Friday (while I'm in work) to collect a table for me.
I wanted two big pine tables together to create a big square workplace for my classes.  
I already had one but found its matching partner on eBay!   
It's only a 170 mile round trip but so worth it!!
Thanks for stopping by and big thanks to those that email and keep in touch too.
Take care.
   

Tuesday, 17 July 2012

Jewellery Gift Box

Hello friends
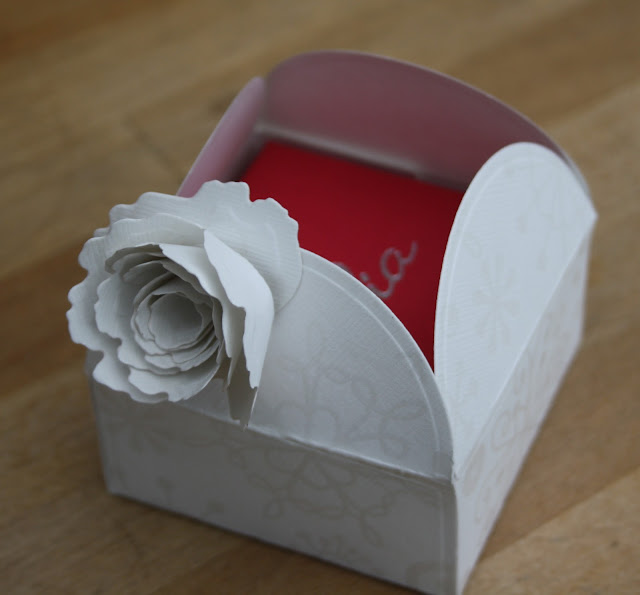
Today I thought I would show you a little box created with the Square Petal Top Box die template.
What I hadn't realised is that standard size jewellery boxes fit inside it perfectly!

I purchased this brooch as a gift for my mum.
It's from Pia - be warned - they have lots of lovely stuff - you'll want to buy something!
I have cut/emboss the box from patterned white card, creased using a bone folder,
once assembled popped the jewellery box inside.
 I created a flower from Spiral Blossom One and a tag (this box die comes with the pretty tag template),
to finish - added a tiny bit of pearl flourish and vintage teal ribbon.
It was speedy and adds that 'homemade with love' touch.
Because of the colouring this would work well for a wedding, anniversary too.
Also, just a few pics of the Birthday tea.
The lovely cake my sister made.
Candles glowing.
And no party would be complete without this special guest...
Have a great Tuesday - I'm off to the crafty studio (big smiles!)
Photos tomorrow...
Take care friends.

Monday, 16 July 2012

How do you store yours??? The results!

Hello friends,
So I've finally put together all the info from my post asking about die storage.
I do eventually get to all these things... :)

You may recall that my storage is simply applying some magnetic tape to the inside of the Spellbinders packaging and popping the dies on to them.
Now to lots of brilliant ideas.

Firstly Michelle - she uses magnets too.
Michelle says: "It's a photo album (pages measure 8inch square) which I've put magnetic paper in -cut down from A4 sheets. I have little tabs on the right hand side with a picture on so I know where to find each die.  Its handy if you go to friends or craft club as its easy to move around."

Next Linda who has sent along a few photos with a superb details.
 Linda says: "I find this way so much easier as it is space saving, each pocket is easily identifiable and it's really inexpensive.  The pockets were under £3 for 50 and the box was £3.  The label card was from my offcuts stash and the only real expense was the magnetic sheets, but even these I can stretch out to save money.   I usually manage to cut EACH sheet up to accommodate at least 9sets of label dies or 6-7 sets of Motif or Accents.  The other big benefit to this storage is that I can also store a card cut-out of each of the dies in the pocket too.  First this allows me to see the actual shape and size of each of the dies but also it allows me to play with mixing and matching different dies together.  Now I can pull out a few different styles and sizes and see which ones look good together or fit together perfectly before actually cutting and possible wasting my good card.

 I identify my dies in two ways: the first is to put a label with the manufacturers number and name on it (you can always hand write this if you don't have a labelling machine) and the second is to group together similar dies.  For instance on the left I have Ovals, Circles, Squares and Rectangles (these will include all the simple Label shapes and the fancy filigree ones).  On the right I have all the foliage and flowers together,  then Tags, buckles etc and next will be the Motifs and coordinating Accents and so on.  I can now find any die I want in seconds without having to flick through them all or having to look through a list to find their position.

Next is Norma.
 Norma says: "I put them on a magnetic sheet and store them in a plastic wallet.  Which does make this easy when I take them to the crop I go."
 I can see how convenient these wallets are, great idea.
Next is Joanna. Wow look at this!
 Joanna says:  "Some time ago my brother-in-law changed the name of his videography business and therefore had a couple of those magnetic advertising signs you put on your car doors going spare. You know as a crafter that you can’t let anything be thrown away and nor can you resist a bargain. 
Also, a sister of mine was re-vamping her kitchen and she had all this wire racking which she no longer wanted so that arrived in my craft room too. My DH mounted the racking on what bit of wall was free of cupboards and shelving and I hung the magnetic sheets on there with cable ties 
(my crop-a-dile punched holes in them like they were butter!)"
What a brilliant way to see all your dies and just grab them as and when you need to.

Thank you so much for sending across your photos.
I'm about to reorganise my dies in the studio so this has been truly helpful.
Back tomorrow friends.  Take care.

Related Posts Plugin for WordPress, Blogger...